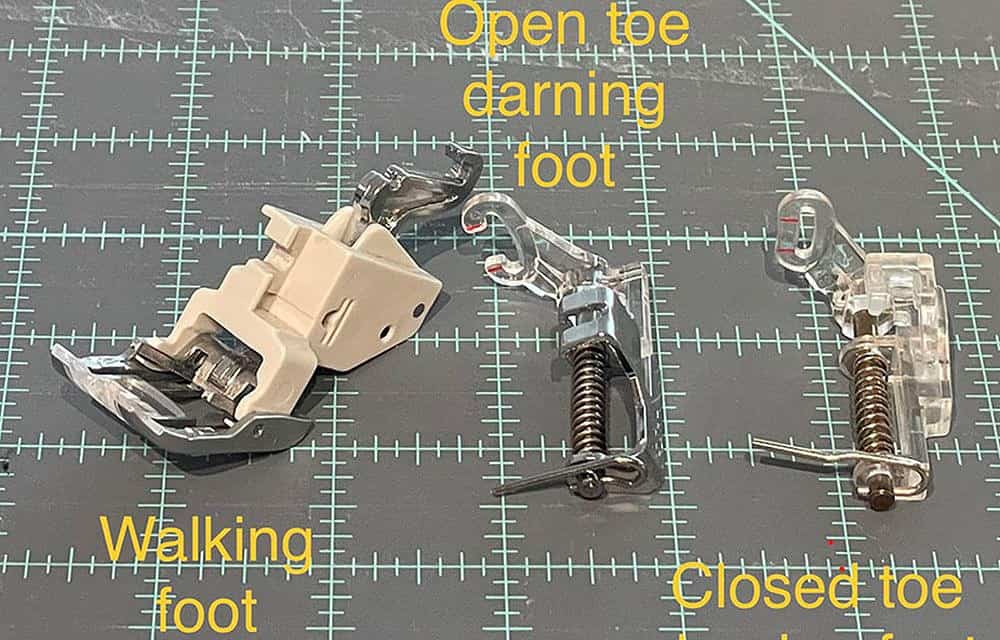
WHICH FOOT SHOULD YOU USE?
Walking Foot or Free Motion Foot? What’s the difference?
So, you’ve made a quilt top and basted it with your batting and backing. Now it’s time to quilt! What foot should you use for the desired effect?
Your regular sewing feet aren’t good for this job. The layers need to feed through your machine at the same rate, and regular feet will pull the layers at the top. That will result in drag and puckers, really not how we want a quilt to look!


What is a Walking Foot?
A walking foot is sometimes also referred to as an even feed foot.
It’s great for straight lines and very gentle curves. It grabs your fabric from the top with extra little feet that help pull everything along at the same pace as the feed dogs down below. The fabric is only fed in one direction. There’s an arm that’s engaged with the motion of your needle, so the foot goes up and down to take your fabric.
The main advantage of this is that you won’t have to do anything to keep your stitch lengths consistent throughout your quilt. The feed dogs will take the fabric through just like regular sewing.
Fun fact: When your feed dogs are engaged, you’re technically not free motion quilting!
What is a free motion foot?
A free motion foot is sometimes referred to as an open toe or closed toe darning foot.
To use it, you drop the feed dogs on your machine and it’s up to you to move the fabric around manually under the needle. The spring on the shaft allows the foot to hop up and down in conjunction with the needle timing. This takes practice and is a totally achievable skill. You’re able to do tighter turns and move the fabric around in any direction to get whatever design you like. There is greater visibility when using these feet. They are usually clear plastic so you can see your design easily.

With either foot, a great way to practice is to make some mini quilt sandwiches and play around to see what you like!
I like to use 10” squares.
Just layer two quilting cottons with batting in between. Use spray baste between the layers to keep them all together. Pins will work fine, but I find it’s easier to work on quilting practice when I don’t have to work about maneuvering around or pulling out pins. You definitely don’t want a pin to end up under these feet, it could do massive damage.
Then take those and start to play! You can trace a design to follow or just make it up as you go along. Busy fabric hides a lot so it’s easy to transition to working on full quilts if you start in those sections.
Walking foot pros:
- Stitch length consistency
- Easy to use right away
Walking foot cons:
- Limited to straight lines and gentle curves
- Generally more expensive, starting around $60 depending on your machine and brand
Free motion foot pros:
- Inexpensive starting around $15
- Clear view to see your work
- Endless curve variations
Free motion foot cons:
- Takes more practice to get confident
- Stitch length consistency will depend on your skills
- Whatever your chosen method, get out there and start practicing!
Happy stitching 🙂
ABOUT THE AUTHOR
Michelle Brassens